Master IoT Control: SSH RemoteIoT Guide For Secure Access
Are you tired of being tethered to your desk, longing to control your Internet of Things (IoT) devices from anywhere in the world? Remote SSH access is the answer, providing a secure and versatile gateway to manage your IoT gadgets, offering unprecedented control and flexibility.
The world of interconnected devices is rapidly expanding, transforming homes, businesses, and entire cities. However, the convenience of IoT comes with a significant challenge: how to remotely access and manage these devices securely. This is where SSH (Secure Shell) remote access becomes indispensable. SSH, a robust network protocol, offers a secure channel to connect to and control your IoT devices over the internet.
Think of SSH as a secure bridge, connecting your computer to your IoT devices, allowing you to send commands, transfer files, and monitor performanceall from the comfort of your workspace. It eliminates the need for complex setups or additional software, providing a direct line to your devices. This makes SSH remote access an ideal solution for hobbyists, developers, and business owners alike.
To fully understand SSH remote access, consider the core components. SSH establishes a secure, encrypted connection between your computer (the client) and your IoT device (the server). This encryption is crucial, as it protects your data from unauthorized access and cyber threats. Through this connection, you can execute commands, upload and download files, and monitor the status of your devices.
The benefits of using SSH are numerous. Security is paramount, with SSH employing strong encryption to protect your data. Furthermore, SSH is versatile, enabling you to manage a wide range of IoT devices, from Raspberry Pis to custom-built systems. It also offers flexibility, allowing you to access your devices from any location with an internet connection. Cost-effectiveness is another advantage, as SSH is an open-source protocol, eliminating the need for expensive software licenses.
However, the advantages of SSH remote access go beyond convenience. It offers a new level of control over your projects, allowing you to monitor the performance of your devices, troubleshoot issues remotely, and update software. For example, if you have a Raspberry Pi controlling your home automation system, SSH allows you to make changes and monitor its performance without being physically present. This can save time and reduce the need for on-site visits.
The setup process for SSH remote access is straightforward. You will need an SSH client on your computer and an SSH server running on your IoT device. For many Linux-based devices like Raspberry Pi, SSH server is pre-installed. Once these components are in place, you configure the connection. This often involves providing the IP address of your IoT device, along with your username and password.
To enhance security, consider employing SSH keys. SSH keys are a more secure alternative to passwords, as they use cryptographic keys to authenticate your connection. This approach significantly reduces the risk of unauthorized access, safeguarding your devices from potential cyber threats.
Let's explore some practical use cases of SSH remote access in the world of IoT:
- Remote Monitoring: Monitor sensors, collect data, and track the performance of your devices from anywhere.
- Remote Control: Execute commands, control actuators, and interact with your devices in real-time.
- File Transfer: Securely transfer files to and from your devices, allowing for software updates and data backup.
- Troubleshooting: Diagnose and fix issues remotely, reducing downtime and simplifying device maintenance.
For example, imagine you're developing a smart garden system using a Raspberry Pi. SSH remote access empowers you to monitor the soil moisture, control the irrigation system, and receive alerts about your plants' health, all without physically going to the garden. This is the power of SSH in action.
One of the most popular platforms for utilizing SSH remote access is the Raspberry Pi. With its affordability and versatility, the Raspberry Pi is a favorite among hobbyists, developers, and educators alike. Setting up SSH on a Raspberry Pi is easy, and by following these steps, you'll be up and running in no time:
- Install the Operating System: Install a compatible operating system, such as Raspberry Pi OS, on your device.
- Enable SSH: Enable SSH in the configuration settings. This may be done through the Raspberry Pi configuration tool or by creating an ssh file in the boot partition of your SD card.
- Configure Network Settings: Configure your network settings, ensuring your Raspberry Pi has a static IP address or a reserved IP address on your network.
- Set up SSH Keys: Generate SSH keys for secure authentication.
- Connect Remotely: Use an SSH client to connect to your Raspberry Pi using the IP address and, if using, SSH keys.
Once you've completed these steps, you will have successfully set up SSH access to your Raspberry Pi, allowing you to control it remotely from any device with an internet connection.
While SSH offers robust security, it's essential to take precautions. Start by changing the default SSH password. A strong, unique password is crucial for preventing unauthorized access. Consider using SSH keys for even greater security. SSH keys use cryptographic key pairs to authenticate your connection, making it extremely difficult for malicious actors to gain access. Furthermore, keep your software updated to patch any vulnerabilities. Regular updates are key to maintaining a secure system.
When it comes to accessing your IoT devices remotely, choosing the right solution is crucial. A RemoteIoT platform can simplify the process, providing a streamlined experience. The RemoteIoT platform streamlines the process of remote device management, including SSH access, offering a user-friendly interface, centralized management of SSH keys, and advanced security features.
For instance, remoteiot platform simplifies remote device management, offering a centralized platform for accessing and managing your IoT devices. It supports SSH, VNC, and other remote access protocols. This can be particularly beneficial for developers and businesses that need to manage multiple devices.
Now, you should be able to connect to your device without a password, using:
`ssh user@your_device_ip`
Here are some essential tips for using SSH on a Windows 10 machine:
- Use a Strong Password or SSH Key for Authentication: This is the first and most important step to secure your connection.
- Secure Your Remote Access with a VPN: A VPN (Virtual Private Network) adds an extra layer of security by encrypting your internet traffic.
- Consider Setting up Port Forwarding: If your IoT device is behind a router, port forwarding is often necessary to allow incoming SSH connections.
Regardless of NAT router or firewall restrictions, using our remote access solution you can safely connect to a device on a private or mobile network.
You can use either ssh or remote desktop (vnc, rdp) for a secure connection.
The benefits of SSH extend beyond Raspberry Pi, offering value across various IoT applications. For instance, with an Android device, you can leverage the power of SSH to remotely manage your devices. This is particularly useful for field technicians and anyone who needs to monitor their devices while on the go. The Android-based SSH solution provides the flexibility and security you need.
Here are some security considerations to keep in mind when using SSH for remote access to your IoT device:
- Change the default SSH password: It is critical to change the default password to a strong and unique one as soon as possible.
- Use a strong password or ssh key for authentication to enhance security.
- Use the most up-to-date software. Keeping your system software and the packages on your Raspberry Pi up-to-date is crucial to protect yourself from the latest security threats.
The following explanation details how this technology works.
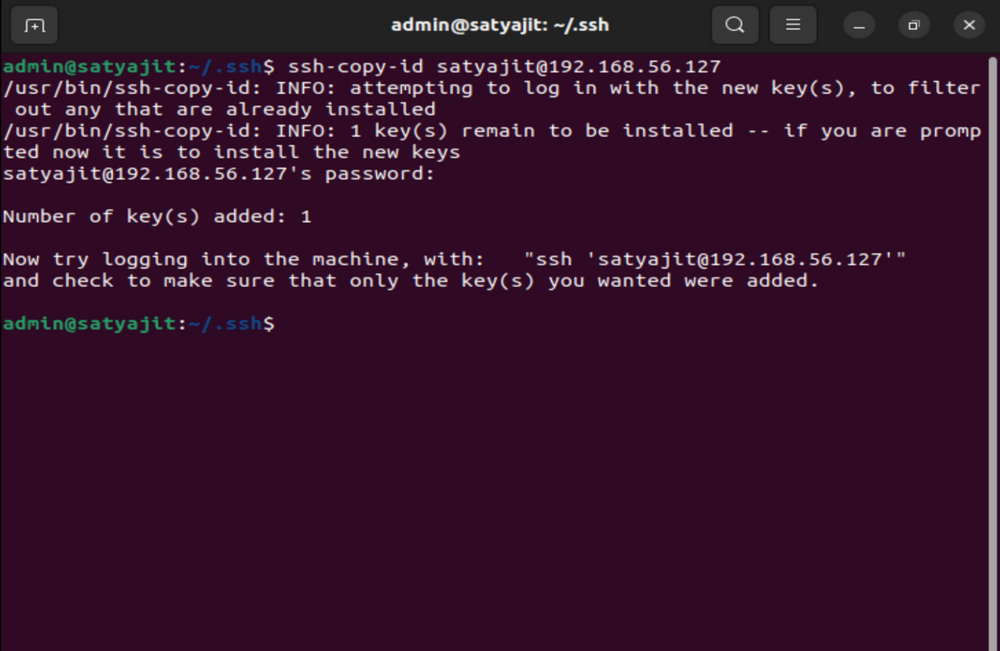
Alternatively, if you are using openssh on linux or macos, you can enter the below command in the terminal:
`ssh-copy-id user@your_device_ip`
Afterward, you will be asked to authenticate the connection using either an SSH key or password.
Here are some basic SSH commands for IoT management:
ssh user@ip_address: Connects to your devicescp file_name user@ip_address:/path/to/destination: Securely copy files to your devicesudo apt update: Updates the package listssudo apt upgrade: Upgrades the installed packagessudo reboot: Restarts your device
Well, a remote management IoT platform is the answer, and it's called RemoteIoT.
By mastering this guide, anyone can get great remote Raspberry Pi desktop access from anywhere via SSH or VNC over the internet, and then use a VNC client to control that tiny computer from any device, nearby or anywhere in the world.
If using an ssh key, your ssh client will automatically attempt to use the private key associated with the public key on the IoT device. Once authenticated, the ssh client will establish the connection with the IoT device. If successful, you will see a prompt indicating that you are now connected to the IoT device via ssh.

![How to Access IoT Devices Remotely with SSH [6 Easy Steps] cloud](https://cloud.lavainfo.my.id/wp-content/uploads/2024/10/Access-IoT-Devices-Remotely-Using-SSH.webp.webp)

 devices from anywhere in the world? Remote SSH access is the answ)